Table of Contents
A4 scanner (LRC SUB) Optibook

This instruction gives you an overview about the possibilities of scanning texts with Plustek scanners and about text recognition by using an OCR programme to save the data as a Word or PDF document afterwards.
1 About this instruction
The steps described in this instruction are not the only possibility of scanning texts. Computers at the LRC SUB offer a variety of programmes which you can use to scan documents. Unfortunately, it is not possible to describe every option thoroughly.
2 Saving texts as image files
You can save your texts as image files. Whether this is desirable or not depends on what you want to use the document for. In general it is more useful to save it as a PDF file on which a text recognition software has been performed before, because this file needs less storage space and the document remains searchable. However, saving the text as an image file is recommendable if you want to edit it in a special text recognition software to save it as a Word document. This procedure has advantages for some programmes.
Scanning texts with the scanner manufacturer's software
- The scanner should be switched off before starting the software.
- Open the programme “Action Express”
- Now the following icon should appear in your task bar:

- Now you can scan the text by using the buttons of the scan device (This procedure saves one picture as one page of scanned text.)
Save document as image file page by page
- Switch on the scanner (it should be switched off before starting the software (Action Express).)
- Now the cross as part of the icon in the task bar should have disappeared.
- Put the document into the scanner and adjust it at the front right corner.
- Press the “Preview” button at the top of the scanner.
Now a window opens where you can modify all settings before scanning the document.
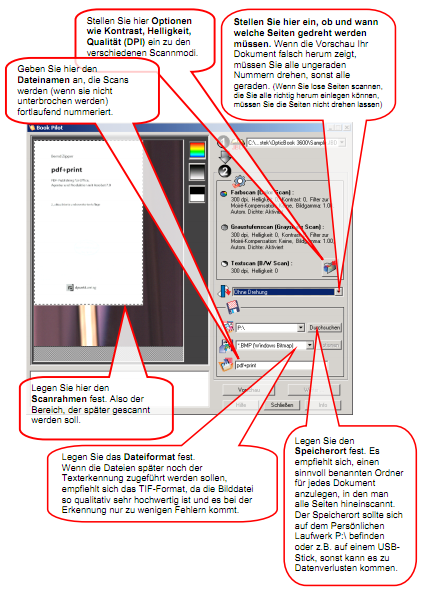
After you have decide on all settings (name of the document, scanning frame, type of file, saving location etc.), press one of the three scanning buttons at the top of the scanner (colour, text scan or greyscale). We recommend to scan pages exclusively consisting of text with the black button. If there are additional b&w graphics on the page, please use the grey button to make sure these graphics will be saved in good quality in greyscale. If there are some images in colour which also should be scanned in colour, press the blue button. If you do not wish to scan in colour then press the grey button. You do not have to scan all pages with the same button!
- Now repeat the process with all pages of your document.
- You do not have to wait for the scanner sled to return to its initial position on the right hand side. If the sled starts to return to the right you can take the already scanned document off and adjust the new page on the scanner window.
- After scanning all pages you can find all images as single files in the corresponding folder.
3 Scan and save text as searchable PDF
If you scan your document by using Adobe Acrobat 8 Professional, it will automatically be scanned as a searchable PDF file which takes litte storage space and where you can copy parts of the text immediately, e. g. quotes. This is a recommendable method if you want to edit your document afterwards, send it as an E-mail attachment or print it off later.
3.1 Preparations
- Put your document on the scanning window and adjust it at the front right corner.
- The scanner has to be switched off before scanning the first page!
- Now open the programme “Action Express” as described in the previous chapter.
- Now switch on the scanner.
3.2 Starting of the software
- Now start the programme Adobe Acrobat 8 Professional.
3.3 Choose scanner
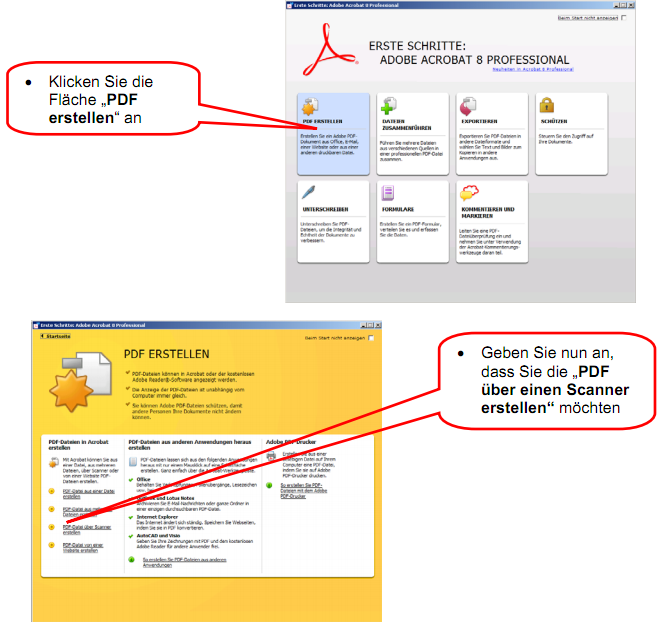
- In the following window choose the scanner you are sitting at. In this case the name of the scanner is WIA-OpticBook 360.
- If you choose the WIA driver you need to adjust the other settings in the following windows.
- Click on “Scannen”.
- Depending on how you want to scan the document, choose between b&w photo or text or a colour or greyscale scan (if the document contains many pictures).
- Now click on “Qualität des gescannten Bildes verbessern” (improve quality of the scanned image).
a4 scanner optibook adobe acrobat professional scanning software searchable pdf