This is an old revision of the document!
Table of Contents
Printing from your own PC (Windows 8)
I. Basics
At various locations studIT offers their users the possibility to print. For using that service, students first have to top up their print contingent at the chip card issue point (in the main lecture hall building), at the learning resources center at the department library of the University Medical School or at the computer center of the faculty of economic and social sciences (“WiSo-Rechenzentrum”). After that they not only can use the studIT computers at university for printing, for example at the LRCs or CIP-Pools, but also their own PC at home or notebook respectively.
Here you can find a list with all printers available with a description.
II. Requirements
- A university/ studIT account and a computer running Windows XP, Vista, 7 or 8
- internet connection
- when using GoeMobile or a private internet provider you need to establish a connection via Cisco VPN-Client, which is not necessary when using eduroam
- installation of the client software for the printing system on your own computer
- balance on your printing account
Brief instruction
- log into GoeMobile or eduroam within its range
- when using GoeMobile or if you want to print at home: establish a connection via Cisco VPN client in order to get an IP address belonging to university
- establish a connection with the printing server \\print-win.student.uni-goettingen.de
- authentication: ug-student\username
- choose and connect to printer
- download and install Papercut client
- print
Attention: When restarting your computer, you need to reconnect to the printers you have once connected to. The reason for this is that the Papercut client needs to be active (visible window with balance for printing).
III. Installation process
1.) Dial-up
To be able to communicate with the studIT printing server, you first need to establish a connection via VPN client to the university network. You can also du that at home when using your private DSL connection. If you use eduroam, you do not need to use the VPN client.
2.) Establishing a connection to the printing server
After dialing-up into the university network a connection to the printing server needs to be established.
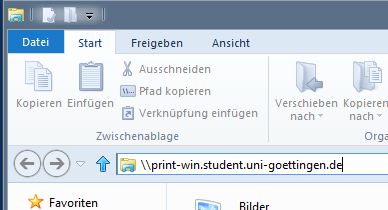
Firstly, open the Windows Explorer. If you still are on the Metro surface, go to desktop (press Win+D until the desktop appears).
Type \\print-win.student.uni-goettingen.de into the address bar and confirm with ENTER.
3.) Authentication
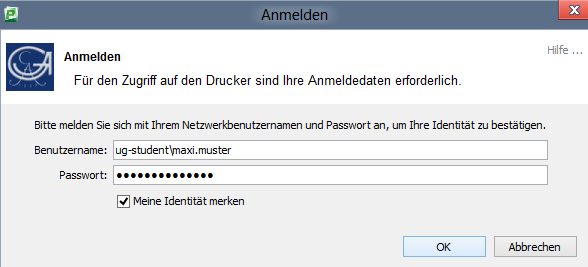
Now a new window opens, where you have to enter your access data so that the printing server is able to assign the user correctly. Into the first field (“Benutzername”), insert ug-student\firstname.lastname (or your account respectively), into the second one (“Kennwort”) enter your password of your account. Confirm your entry with OK.
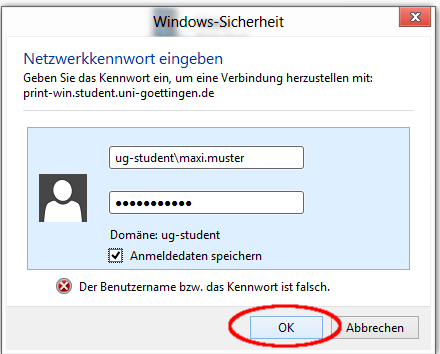
Important: Do not forget to write the domain ug-student\ in front of your user name!
For future connections you also can save your login data so that you do not have to insert it again (tick “Save registration data”).
4.) Choose and connect to printer
After successful authentication a new window opens listing all printers available. Normally it is only possible to connect to printers of your own department or public printers, e. g. at the LRCs. Here you can find a list with all printers available and its location.
Now choose a printer. The installation process starts by double-clicking on the respective printer. Here a printer at the CIP-Pool Jura serves as an example. During the installation process of some printers a warning message will be displayed which can be confirmed without hesitation. It is also possible that the installation process may take some minutes and seem to have crashed (no response). Just be patient  . After that you can see the queue of the just installed printer. From this time on you can use the printer and choose it in programs such as Word etc.
Important: Your computer is connected to the printer as long as there is an active VPN connection. If you log out or restart your PC the connection will be interrupted. Even if you still can see the printer in programs you have to reconnect to it again.
Please note: After a certain period of time print jobs are being disposed. Every user should ask the advisors at the different locations for further information or read the announcements respectively.
5.) Installation of the Client software
Since October 2011 you need a special Client software for using the printers. This software is installed on all studIT- and CIP-Pool computers on campus as well.
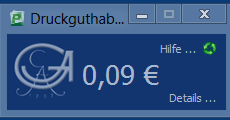
After every sent print job the program shows a control message with the costs of the respective print job. After you have confirmed the control message your print job will be printed. This program also shows the current print contingent.
The Client software has to be installed only once. There are versions for Windows (XP, Vista, 7), Linux and MacOS X.
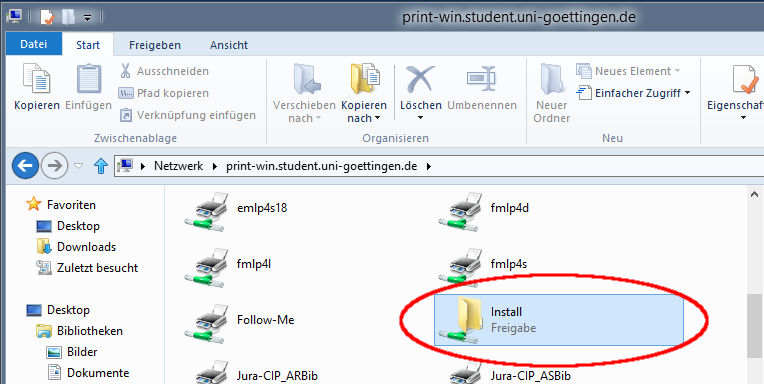
After connecting successfully to the printing server (see steps 1-3) you can also see a shared folder called “Install” which contains the Client program called “Client_Nutzer”.
(The complete path is \\print-win.student.uni-goettingen.de\Install\Client_Nutzer.)
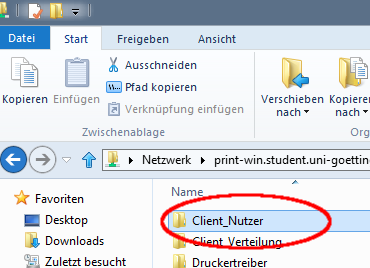
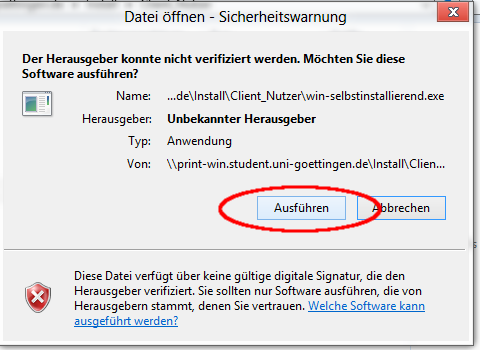
Windows user just need to start the program “win-selbstinstallierend.exe” which automatically installs the Client on the computer.
Open the folder “Install”
Open the folder “Client_Nutzer”
Run the file by double-clicking on it

Confirm the running of the file
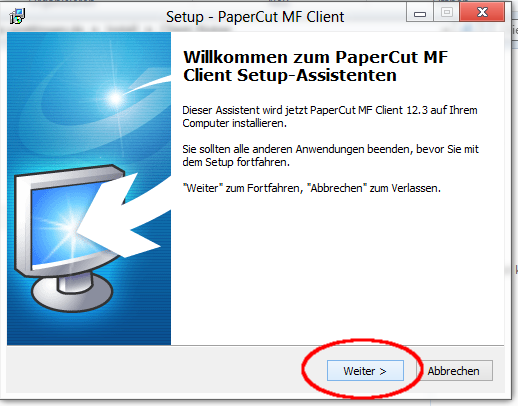
Click on “Weiter”
After clicking on “Weiter” you will be lead to the license agreement. Please confirm by clicking on “Ich akzeptiere die Vereinbarung”, then press “Weiter”.

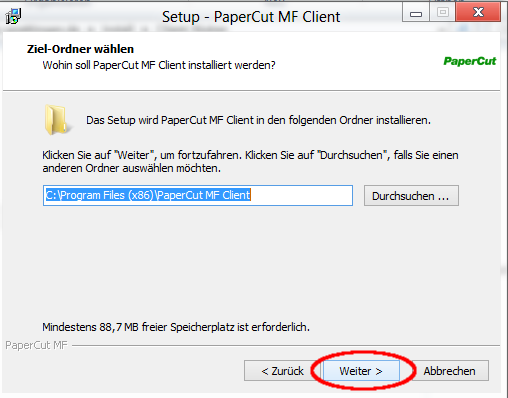
Now you can choose the location on which the client will be saved on your computer. Although it is up to you, it is most reasonable to save it on “C:\Programs\PaperCut MF Client”. Please note that the program needs at least 87,8 MB free storage space.
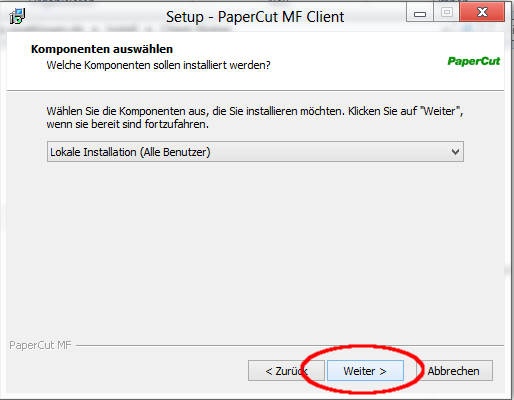
As components please choose “Lokale Installation (Alle Benutzer)” so that every user of the computer is able to use the program.
Now you can start to install the program by clicking on “Installieren”. Before clicking on it, please make sure that you have chosen all options correctly.

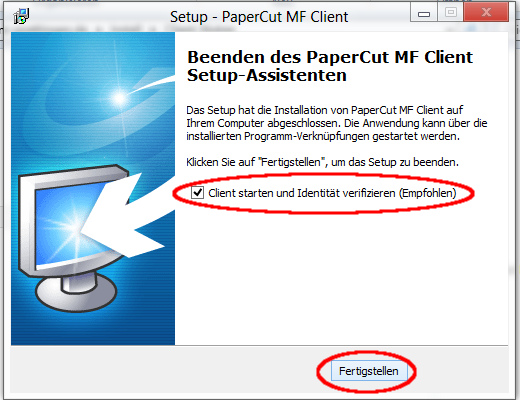
If the installation process is finished, tick “Client starten und Identität verifizieren (Empfohlen)” and click on “Fortfahren”. Now a popup window opens.
Now log in with your student/ university account.
If you have logged in successfully, a popup window on the right hand corner should appear which shows your print contingent.
Run the Client software after installation
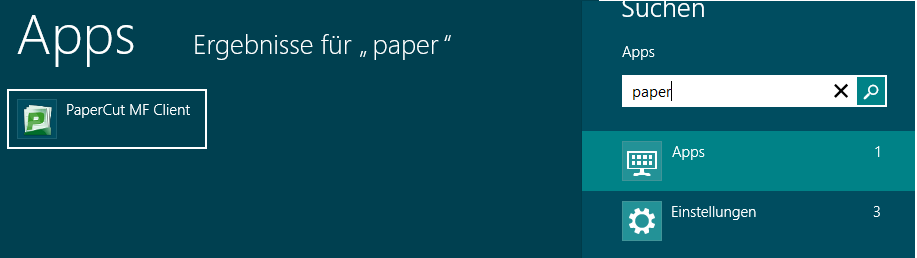
If the Client does not start automatically after installation you can search for the program via the metro surface.
For doing so, press the windows key to switch into the metro surface and insert “paper”. On the left hand side you can see the Paper Cut symbol with which you can run the program.
Running the program without installation process
If you do not want to install the Client software on your computer or if it is not possible, you can also run the program “pc-client.exe” directly from the folder “win”. The program is active and can be used until the restart of your computer. It was not installed.
For using the Linux- or Mac OS-Clients you have to download and unpack the respective ZIP-file.
Advice for a easy use
For connecting to the network drive in point 3 it is possible to save the connection data for future use.
Important: Do not forget to write the domain ug-student\ in front of your user name!
You can create a shortcut of the printer by right clicking on it and dragging it on the desktop.

You also can drag the links of the VPN client (if you're outside the university network, that is to say at home or if you have established an unencrypted connection to GoeMobile) and the Papercut client on your desktop.
In doing so, after a restart of your computer you only have to click on the three links in the right order to connect to the printer (VPN → Papercut Client → connect to the printer).
The only program where you have to authenticate with your password is the VPN client since it does not save passwords.
Possible problems - solutions - contact persons
If printing from your own PC does not work, the following questions might help you:
- Have I chosen the right printer at the right location?
- Is there an active VPN connection?
- Have I topped up my print contingent?
If still problems do occur, please talk to one of our advisors at our helpdesks.
printing printer at home win8 windows8