This is an old revision of the document!
Table of Contents
eduroam (Windows)
![]() The following instruction shows you how to connect your Windows computer with the WPA2 encrypted network called “eduroam”.
The following instruction shows you how to connect your Windows computer with the WPA2 encrypted network called “eduroam”.
Requirements
Make sure that your network adapter automatically obtains an IP and that it has no fixed IP address. You can check that on
Control Panel→ Network and Sharing Center→ Adapter Settings→ Wireless Network Adapter: Settings→ TCP/IPv4.
To log in you need your university e-mail address (firstname.lastname@stud.uni-goettingen.de) and your password.
In case students of other universities want to use eduroam as well, they need to enter their university e-mail address respectively, e.g. ending in @uni-kassel.de, @uni-hannover.de, @leuphana.de, @uni-freiburg.de, @uni-regensburg.de, @abdn.ac.uk etc.
Establish a connection to eduroam
1. Click on the WiFi/ network icon and check if you can find eduroam in the list. After that click on “Network and Sharing Center”.

2. On the left hand side, click on “Set up a new connection or network”,choose “Manually connect to a wireless network” and click “Next”.
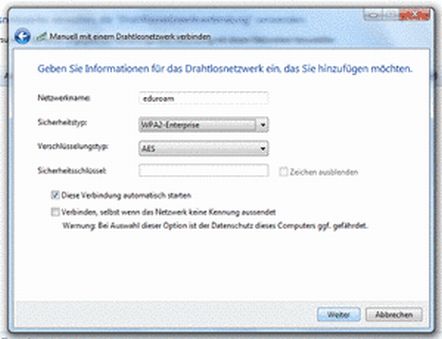
3. Now type “eduroam” as network name, choose “WPA2-Enterprise” as security level and “AES” as encryption type. Now click on “Next”, then on “Change connection settings”.
4. Click on the tab “Security”. Below choose “Microsoft: Protected EAP (PEAP)” as method, then click on “Settings”.
5. Now tick “Verify server certificate” and choose “Deutsche Telekom Root CA 2” as root certifying authority in the list. Setze dann Haken bei “Serverzertifikat überprüfen” und in der Liste der Stammzertifizierungsstellen bei “Deutsche Telekom Root CA 2”. If you cannot find this certificate in the list, you can also install it here: http://ca.gwdg.de/

6. In the box “Select Authentication Method”, choose “Secure Password (EAP-MSCHAP v2)”, click on “Configure…” and uncheck the box “Automatically use my Windows logon name and password (and domain if any)”. Now click “OK”.
7. In the dialogue “Protected EAP Settings” uncheck “Enable Fast Reconnect”, then click “OK”.
Now a connection to eduroam can be established. If this does not happen automatically, just click on the WiFi icon in your task bar and connect to eduroam.
8. It might be the case that you are presented with the choice of a location for this network, please choose “Public Location” for not activating any unwanted sharing of your data.
Videos for Windows 7 and XP
The GWDG also provides two video tutorials for how to connect to eduroam, for Windows 7 and XP. Important: The login name for students is the student university address (firstname.lastname@stud.uni-goettingen.de). In the video a GWDG account is used!!
Windows 7 video tutorial:
:support:wlan:einrichtung_eduroam_auf_windows_7.mp4
Windows XP video tutorial:
:support:wlan:einrichtung_eduroam_auf_windows_xp.mp4
WLAN eduroam wireless radio network GWDG