Table of Contents
A3 scanner (LRC SUB)
In this instruction you will learn how to scan and save documents as pictures by using the DIN A3 scanner.
Turning on the DIN A3 scanner
 If the device is switched on you can see the green lamps burn. Attention: The scanner should be switched on before you log in at the computer (only if you use the GT12000 in the first row of the LRC SUB).
Scanning documents
Firstly, put the document into the scanner. For doing so, open the top flap of the scanner and put the paper at the marking. For scanning documents (e. g. pictures, posters etc.) we recommend to use the original Epson software to be able to save them as pictures and to edit them after scanning (e. g. merge files into a single PDF document etc.). Of course it is possible to use the scanner via other programmes.
On/ Off switch

The original software is called EPSON Scan and can be found here: Start→Programme→EPSON Scan

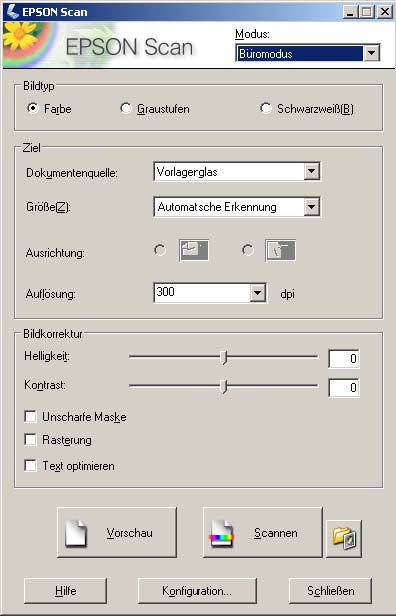
After running the programme the following window appears after a short time of loading it:
If an error message appears instead of this EPSON Scan window, the scanner was not switched on before the login. Then you have to restart the computer.
Now click on “Vorschau”. By doing so, the document is being scanned rapidly to create a preview.
After generating the preview it is possible to adjust settings concerning the type of the scanned image (colour, b&w or greyscale), resolution (the higher the resolution, the bigger the size of the file) and corrections of the image (brightness, contrast, improvement of the text if you only scan text etc.)

The document will be shown in the preview window as it will look like after scanning. That is to say, changed settings (contrast, brightness, colour or b&w etc.) are being shown directly in the preview window. Here you can also set up a scanning frame with your mouse to mark the area which needs to be scanned in the end.
After adjusting all settings, click on “Scannen” to start the scanning process. After that a window appears where you can choose where you want to save the scanned document.
Image formats
TIFF (.TIF)
- most common used image format
- good uncompressed quality
- but: large files
Bitmap (.BMP)
- standard file format for graphics and artworks for Windows applications
- supports b&w, greyscale, 4-bit, 8-bit, 24-bit and 32-bit colours
- unsuitable for compressing 24-bit colour images
JPEG (.JPG)
- world-wide-web standard
- standard format for photos that were captured with a digital camera
- loses quality during file compression
PDF (.PDF)
- can be used independently from the system (portable document format)
Saving scanned documents

In this displayed window you can choose the location of where to save your scanned documents. Here you should choose a folder or location which you find again in any circumstances. We recommend to go to “Benutzerdefiniert” to save the images on the desktop or to click on “Durchsuchen” to choose a good place for saving the data.
After that you can choose the name of the file (prefix). If you scan more than one document, the names of the files will be numbered consecutively. The next section refers to the image format where you can choose JPEG, BMP, TIFF or PDF (see above). If you click on “Options…” you can adjust parameters like quality for each type of file.
scanning a3 lrc sub jpeg bmp tiff pdf epson scan